
Using Japanese on a Windows XP PC
| Japanese support for Windows has been available since Windows 95, though it does require additional software to be installed. Unfortunately (sasuga Microsoft), this only works with MS Office and few other applications. For earlier versions of Windows, this site has some good info and links. |  |
| The first thing you need to do is install the Japanese Language Pack for Office XP. To do so, go to this site, read the instructions, and download and install the Language Pack. | 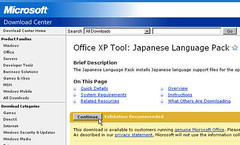 |
| To be able to type in Japanese in MS Office XP applications, download and install the Global IME (Japanese) for Office XP. Go to this site, read the instructions, and download and install the Global IME. | 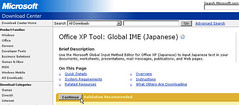 |
| Once IME is installed, you should see the IME icon on the bottom right of your taskbar. It looks like a blue-green square with a 2-letter abbreviation for the language you are currently using (e.g. EN for English and JP for Japanese). You can click on this icon to change the language. |  |
| Select the input mode you would like to use. If you don’t see the language bar next to the icon, click on the IME icon again and select Show the Language bar. This will display the language bar at the top (or bottom if you click minimize) of your screen. You can then select the input mode(usually Hiragana) by clicking on the icon with the letter A. To toggle between typing in hiragana and romaji, press the Alt and ~/` keys simultaneously. |    |
| You can now type in your application. If you type the romaji, the hiragana will appear with a dotted line beneath it. Hit Enter to enter what you typed. |
 |
| To type in kanji, after you type in the hiragana for the word, hit the spacebar and the suggested kanji will appear. If that is not what you want, hit the spacebar again and a window will appear that presents you with options. Select the kanji you want and hit Enter. |  |
| Congratulations! You should now be able to type in Japanese. Ganbare! | おめでとう! |

